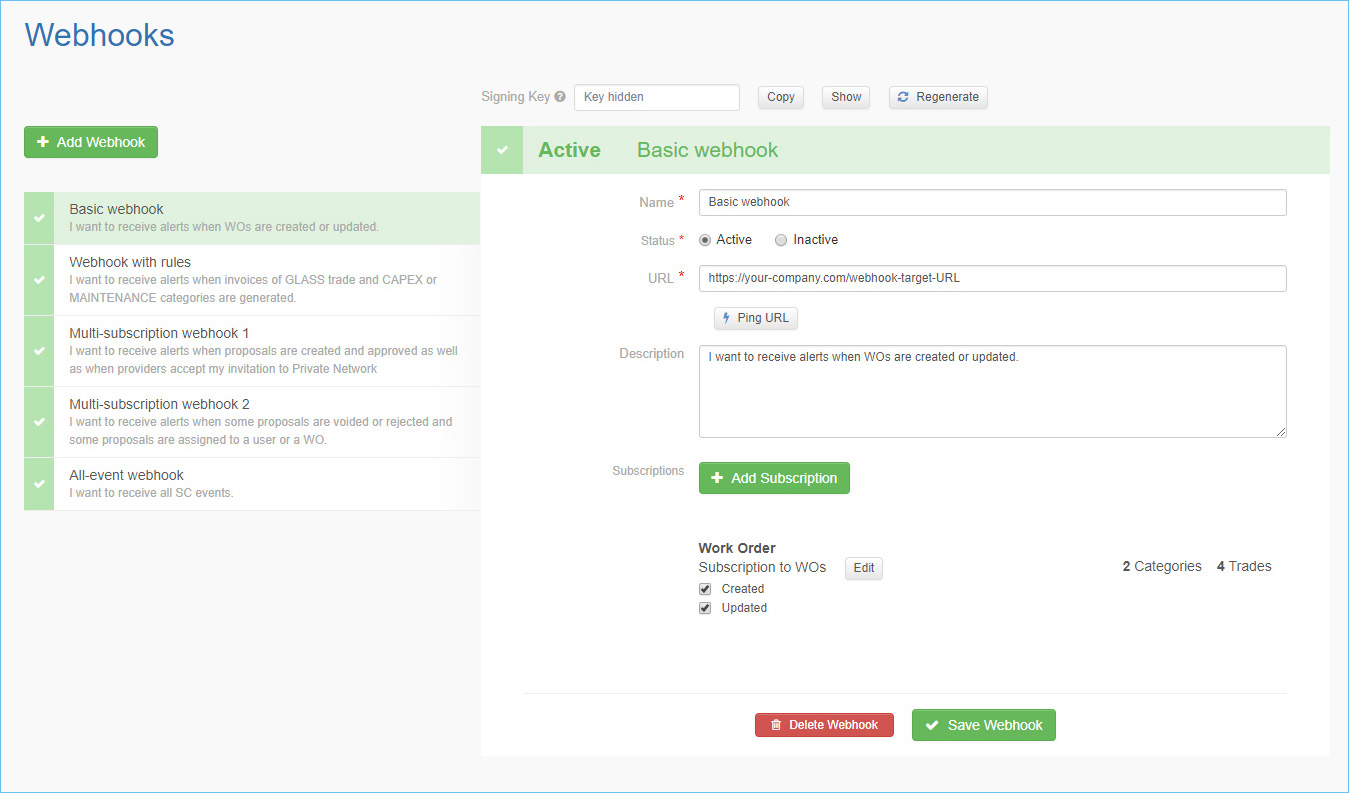
Create and Manage Webhooks in Service Automation
Besides setting up webhooks via the API, you can create and manage them in the Webhooks section of Service Automation and Provider Automation.
To access the Webhooks section:
- For subscribers: Navigate to the hamburger menu > Admin > Permissions > Webhooks
- For providers: Click one of the buttons depending on the environment you’re working in: Sandbox2 Production
Important: To create and manage webhooks, you need to have the following permissions:
- For subscribers: an account with the Super Admin secondary role.
- For providers: an account with the Provider Automation Admin access level.
Note: Webhooks are an add-on feature. Contact your ServiceChannel representative should you not see the Webhooks section.
Create a Webhook
Let’s register a webhook to receive notifications from ServiceChannel and always be up-to-date.
- In the Webhooks section, click Add Webhook.
- Enter a webhook name, URL for receiving events, and description.
- Under Status, select Active to enable the webhook.
- Click Add Subscription.
- Select the object you want to subscribe to and enter a subscription name.
- (Optional) Click Add / Remove Trades and Add / Remove Categories to filter the events. Select the required trades and categories, and then click OK. You will receive events that belong only to the selected trades and categories.
- Click Add Subscription.
- Under the object and subscription names, select the events you want to subscribe to.
- (Optional) Repeat steps 4 – 8 to add more subscriptions.
- Click Save Webhook.
Once you save an active webhook, it starts sending notifications when the event is triggered.
Test Your Webhook URL
Validate that the URL for receiving events is correct and your server is properly configured.
- In the webhooks list, click a webhook that contains the URL you want to test.
- Under the URL field, click Ping URL to receive a test event to your webhook URL.
If the test succeeds, you should receive a test JSON payload to your URL. If the test fails, you will see an error message. Check if your server is available and responding with a 2xx status code.
Edit a Webhook
You can edit a webhook name, description, target URL, and subscriptions. You can also add new subscriptions to your webhook.
- In the webhooks list, click a webhook that you want to update.
- Edit the webhook.
- To update the webhook name, status, URL, or description, edit the required fields.
- To edit the subscription list of events, select or deselect the events under the object subscription names.
- To edit the subscription name, trades, and categories, click Edit to the right of the subscription name. Update the necessary fields and click Update Subscription.
- To create a new subscription, click Add Subscription.
- To delete a subscription, click Edit to the right of the subscription name, and then click Delete Subscription.
- Click Save Webhook.
Enable or Disable a Webhook
You can temporarily deactivate a webhook to stop receiving its events or activate a webhook that was previously disabled.
- In the webhooks list, click the webhook you want to turn on or off.
- Under Status, select Active to enable the webhook or Inactive to disable the webhook.
- Click Save Webhook.
Note: When you disable a webhook, it is not deleted from our system and can be enabled back at any time.
Delete a Webhook
When you have decided that you do not need a particular webhook, you can delete it from the ServiceChannel platform.
- In the webhooks list, click the webhook you want to delete.
- Scroll down and click Delete Webhook.
Get the Signing Key
We sign every event with a special signature to confirm that the data is originated from ServiceChannel. This signature is based on the payload you receive and your signing key.
- On top of the Webhooks page, click Show to display your signing key.
- Click Copy to copy your signing key into the clipboard.
To check event integrity and authenticity, compute the expected signature using the signing key, and compare the expected signature to the signature in our webhook request. See Verify an Event for more information.
